
This is a quick tutorial on how to pry the Alfine 11 gear hub (SG-S700, the original) open to replace its three bearing ball races once they wear out, which is normally the only parts that may need servicing.
The only reason why you'd want to open an Alfine is to replace its ball bearings because their metal cages can/will break . And in case the whole assembly is broken, considering the parts (+ labor) cost, you're probably better off financially buying a new core , or possibly a whole new Alfine hub.
"In fact, most IGH axles are being rotated toward the back in the high torque low gears. When you stand on the pedals it creates even more force. This is why it is important to have non-turn washers that precisely engage the drop-out and torque the axle nuts to 32-35 foot-pounds. Be sure to grease the threads to ensure proper torque." ( Source )
"the torque to the frame is lower if the hub mostly gears up rather than down. On the other hand, greatest efficiency of a hub gear is usally at the unity ratio, with the gears idling -- and this is best as the most often used, level-ground gear, which is much closer to the top of the useful gear range than to the bottom. Lower gears will then impose a large torque on the frame." ( Source )
https://www.kstoerz.com/freespoke/hub/190
https://newwheel.net/questions/pages/viewpage.action?pageId=57671795
Spoke computation:
https://hubstripping.wordpress.com/2010/02/03/11-speed-alfine-hub-from-shimano/
https://hokkaidowilds.org/shimano-alfine-8-speed-internal-gear-hub-oil-bathDONE http://lockies.blogspot.com/2009/09/shimano-alfine-hub-gear-rebuild.html
DONE https://bikeshed.johnhoogstrate.nl/bicycle/drivetrain/shimano_alfine_inter_11/
DONE Alfine 11 Strip Down by Matt Signorini
DONE https://singletrackworld.com/forum/topic/alfine-11-bearing-maintenance/
Gear oil is needed to lubricate the seals, either Shimano's or compatible oil.
Flat screwdriver.
The following tools from Shimano are required, and can be found for about 60 euros total when shopping around:
The first three tools are used on the drive-side of the hub, while the last one is used on both sides. Note that the Dust Cap is left-threaded, so must be loosened by turning clockwise.
https://www.bike-components.de/de/s/?keywords=SG-S700
Here are the three ball bearings included in the Alfine 11:

Hit hard with the TSl-S701 to remove the right-hand cone, and hit harder with the TL-S702 when putting it back for the two tabs to show through and let the driver plate sit and rotate like it should; Otherwise, the cassette joint won't rest deep enough onto the assembly, preventing the cassette joint from operating correctly, or at all. You can check it works OK by just holding the partially disassembled unit, and rotating the cassette joint by hand: If it doesn't, the driver plate is sitting too high (outward) on the axle. But the real test is pulling the cable with the shifter, and checking that all eleven speeds are available.
The spring goes one way (wider part at the bottom)
As usual, make sure you the bearing ball cages are installed the right way (cage showing out)
A plier is helpful to reinstall the E clip, but a small flat screwdriver does the job too
Doesn't look like the TL-S704 "Seal Set Tool" is necessary: Removing of the seal can be done with a flat screwdrive gently, and putting it back/a new one can be done by hand + mallet.
When adjusting the two yellow marks for indexing, shift down from gear 11 instead of up from gear 1: "The Alfine-11 gear alignment is checked in gear 6, but getting there from gear 1 may leave slack in the shift cable. Start in gear 11 and count back to gear 6 so the cable tension is increasing. I've found that this is the way to predictably get the marks to line up on my hub" ( Source )
The TL-S700B (the TL-S700 only works with Alfine 11) is useful to tighten the anchor bolt at the right distance.
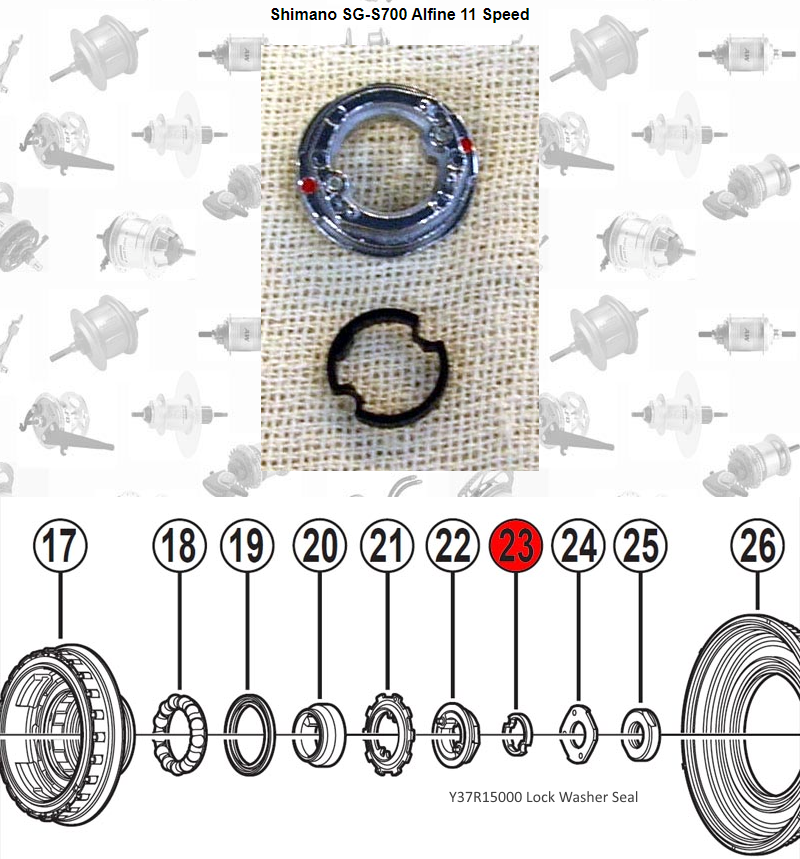
"Above [part 23] is the right side axle seal that sits outside the cone. As you can see it is a very complicated seal and it often leaks. It can be removed, degreased (and the seat it sits in), then coated with 100% silicone. This will fix the axle oil leak, but oil may still seep out the larger main seal. The main seal [part 26?] should be replaced every oil change to prevent leaks. Also, never lay an internally geared hub on it's side for long periods of time. If you need to transport a bike horizontally, lay it on the drive side and put a rag under it!" Source
"With the dustcap off you can now see the large main hub bearing race which is a frequent source of trouble in Shimano hubs through contamination with water and muck. It’s a strikingly poor design to use such a flimsy plastic dustcap to seal an oil bath hub." Source
"Au-delà de ça le alfine11 est sujet à faiblesses de par sa conception : épaulement du pignon hélicoïdal sur certains rapports, quantité de vitesse à commander par rapport à la capacité de rotation de la platine de réception de câble (indexation de rotation de la fourchette qui devient extrêmement précise en interne vu que l'axe est de "petit" diamètre) . De fait les témoins de réglages extérieurs ne correspondent que rarement parfaitement à ce qu'il se passe en interne côté équipage mobile, pouvant occasionner une usure très prématurée dans certains cas . En fait le réglage exact en tenant compte de cet aspect est très pointu et n'est pas documenté par Shimano, il se fait autrement qu'avec les repères d'alignement...
La version avec commande électronique est amha à fuir, les retours font état de la fragilité des connecteurs (alors que la boîte est censé durer plusieurs dizaines de milliers de kilomètres, bon, voila). Je ne sais pas comment il fonctionne précisément mais si on ne peut pas compenser le réglage (Voir pourquoi dans le paragraphe précédent) ça n'augurera rien de vraiment bon .
Les forums anglophones regorgent de ressources à ce sujet pour qui se donne la peine de chercher ;-)
À mon avis sa durée de vie n'a rien à voir avec un "bête" 7 vitesse (Bien + simple de conception forcément). J'ai démonté celui de mon biporteur il y a deux semaines car il faisait du bruit), il doit avoir entre 10 et 20.000 (Je n'ai pas l'historique d'avant que je le récupère mais il avait déjà pas mal roulé) . Hormis le centimètre de flotte qu'il y avait à l'intérieur tout semblait en excellent état après démontage puis nettoyage intégral dont passage à l'eau chaude (Toutes pièces rendues propre pour inspection) . Je n'ai pas démonté intégralement le sélecteur parce que le ressort est compliqué à remettre et qu'un passage à l'eau chaude a suffit pour tout bien nettoyer, mais j'ai tombé toute la pignonerie . ensuite graissage des 3 roulements et huile aux bon endroits
Le 11 sera moins fiable qu'un Rohloff, par conception comme je l'ai expliqué + haut . Brucey en parle aussi dans d'autres topics ... Au delà d'un certain nombre de vitesses il faut "déporter" l'indexation côté moyeu (Rohloff) . Parce que avec une commande rotative qui fait tourner une fourchette sur l'axe (Shimano) indexée côté manette, il faut augmenter la précision d'usinage côté moyeu vu qu'on met + de vitesses, avec les risques que ça implique (et provoque) . Sans compter que les mouvements du cadre tirent sur les câbles quand il se déforme (pas énorme mais il se déforme, c'est inévitable) et donc en charge le réglage de la boite bouge/change (alors que le réglage aux témoins ne reflète souvent déjà pas exactement ce qu'il se passe en interne :-/ ) ." ( Source )